
Swapping a face in a video can seem difficult if you’ve never used an AI editing tool before. In practice, most beginners can get a decent result by choosing a clear source face, uploading the right video, and checking the final result carefully.The quality depends on more than the app itself. Lighting, camera angle, movement, video length, and the clarity of both faces all affect the result. You should also have permission from anyone whose face or video you use, especially if you plan to share the finished clip.
Choose a Tool and Prepare Your Files
Start with a browser-based tool such as EasyFaceSwap. This is often the simplest option for beginners because you don’t need to install complex editing software or learn a timeline editor. You’ll usually upload a video, add a source image, and let the tool process the swap.
Before opening the tool, gather two files. The first is the video you want to edit. The second is a photo of the face you want to place into the video. A front-facing portrait usually works best, but a slight turn of the head can also work if the face in the video has a similar angle.
Choose a video with steady footage and enough light on the person’s face. A short clip is a better starting point than a long one because it processes more quickly and gives you fewer frames to check. If the subject turns away, covers their face, or moves very quickly, the software may produce visible errors.
Your source photo matters just as much. Use a sharp image with the entire face visible, including the forehead, cheeks, chin, and both eyes. Avoid sunglasses, hands over the face, heavy shadows, extreme filters, and photos where the face is partly cut off.
It also helps to match the general conditions in both files. A bright portrait placed into a dark video can look unnatural. The swap may still work, but the difference in lighting can make the edit easy to spot.
Step 1: Upload the Video and Face Image
Open the Video Face Swap tool and look for the upload controls. Select the video first, then add the image that contains the replacement face. The labels may differ slightly depending on the version of the tool, but the basic process is usually the same.
Take a moment to confirm that you selected the correct files. Beginners sometimes upload a group photo, a screenshot, or a low-resolution image by mistake. If the tool displays a preview, check that the target person is visible and that the source image shows one clear face.
The video format can also affect the process. Common formats such as MP4 tend to be the safest choice. If your file won’t upload, it may be too large, too long, or saved in a format the tool doesn’t support. Re-exporting it as a shorter MP4 often solves the problem.
Keep the first test simple. A five to fifteen second clip is long enough to judge the result without waiting for a full project to process. Once you understand how the tool handles your files, you can try longer videos or more challenging footage.
Step 2: Start the Face Swap
After both files are loaded, start the face swap process. The tool will identify the face in the source image, track the face in the video, and place the new facial features across the relevant frames. Processing time depends on the video length, resolution, and current server load.
Avoid closing the browser while the process is running unless the tool clearly says it can continue in the background. You don’t need to keep clicking or refreshing the page. Most tools show a progress indicator or display the finished video when the operation is complete.
The first result may not be perfect, and that doesn’t necessarily mean you did something wrong. Face swapping is more reliable when the subject looks toward the camera. It becomes harder when the person turns sharply, changes expression, walks behind an object, or appears in poor lighting.
Watch the entire output rather than judging it from the first few seconds. Look for moments when the face becomes blurry, slips out of position, changes size, or fails to follow the head. Small issues can be easy to miss if you only inspect the thumbnail or preview frame.
Step 3: Review and Download the Result
Once the video is ready, play it from beginning to end. Check the eyes, mouth, jawline, and edges of the face. The most noticeable problems often appear around the hairline, ears, chin, or neck because these areas move with the head and are difficult for automated tracking.
Pay close attention to speaking scenes. Mouth movement can expose an imperfect swap faster than a still expression. If the replacement face appears frozen while the original person talks, the source photo may not provide enough information for the tool to create a natural result.
If the output looks good, download it in the available format and save a separate copy of the original video. Keeping the original gives you a safe backup if you want to try a different source image or make a shorter edit later.
If the result needs improvement, don’t immediately assume you need another app. Try changing one factor at a time. A better-lit source image, a shorter video, or a clip with less head movement can make a larger difference than repeated attempts with the same files.
You may also get a better result by trimming the video before uploading it. Remove long pauses, crowded scenes, and sections where the face is hidden. A focused clip gives the face tracking system fewer difficult frames to handle.
Tips and Common Mistakes
The table below summarizes the choices that usually matter most when you’re starting out.
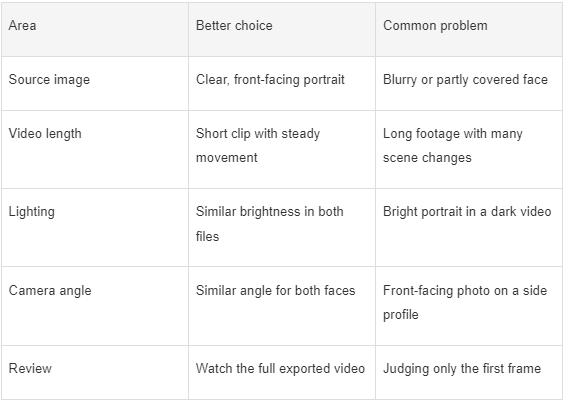
One common mistake is choosing a source face that looks very different from the original face in size or angle. A tool can adjust some differences, but it cannot always make